CPU and iMac card temperature monitor. A Few Useful Mac Tweaks You Shouldn't Skip
Apple makes very reliable computers that can last for weeks or months without rebooting. And OS X is a fairly smart operating system that intelligently distributes system resources. Usually, the average user has no need to look behind the scenes of this entire “kitchen,” but if you want to keep all your Mac’s system resources under control, you can’t do without special applications. Such applications will be discussed in this article.
iStat Menus
One of the most famous utilities that provides detailed information about all the hardware components of your Mac (looking ahead, I’ll say that this is my favorite). The application allows you to very finely customize the display of the necessary elements directly on the menu bar, as well as arrange necessary information in the drop-down menu. For example, in my menu bar there are indicators for the processor, memory, battery and network activity, and with a quick glance I can always see how loaded the Mac is at the moment.
Displaying information in a drop-down menu is implemented very conveniently; when you hover over a specific element, detailed consumption graphs are shown (per day, per week, per month). In addition, iStat Menus allows you to adjust fan speed and create profiles for this.
If you want to monitor absolutely all the resources of your Mac, iStat Menus is an ideal option.
gfxCardsStatus
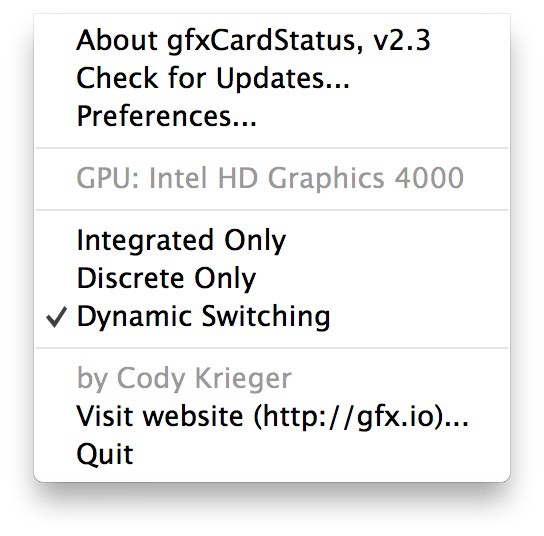 If you are the owner of a Mac with two video cards, I advise you to pay attention to this application. By default, the user cannot choose which graphics card to use, since OS X itself switches between integrated and discrete graphics, depending on the current load. The tiny free utility gfxCardsStatus is designed to correct this shortcoming. Now if you need high performance or vice versa maximum savings energy - just select the appropriate item in the gfxCardsStatus menu. Everything is in your hands!
Disk Doctor
 We store a large quantity useful information on the disks of our Macs and over time it becomes more and more. Gradually, various unnecessary and no longer relevant information accumulates, which also takes up disk space - application caches, mail attachments and other large files hidden in the depths of the file system. Disk Doctor will help you monitor your Mac's disks and clean them up in a timely manner, preventing them from becoming full.
If you're running out of disk space, Disk Doctor will help you win it back.

Temperature Gauge
 Nowadays, the development of technology has made it possible to eliminate cases of overheating of Macs, but such situations still occur among unwary users. Luckily, with Temperature Gauge you can monitor fan speed and temperature by reading data from all the sensors on your Mac.
If you frequently push your Mac to the limit or just want to keep your gauge bar handy at all times, use the Temperature Gauge.

Memory Clean
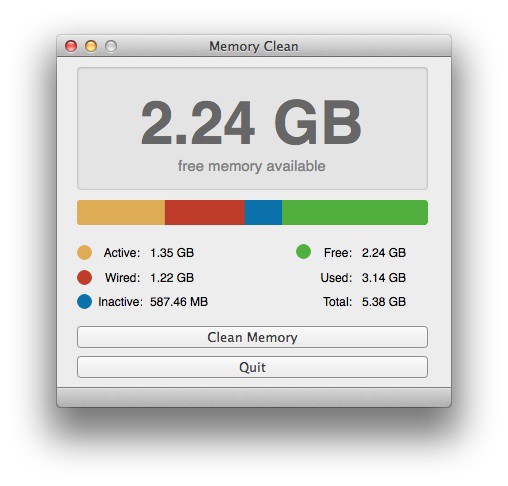 And the last resource that applications tend to “devour” is random access memory or RAM. All applications and games consume memory while running, and the longer they run, the more memory they eat up. Running OS X Mavericks on Macs with less than 4 GB of memory may be uncomfortable and cause delays. Memory Clean will help you identify power-hungry applications and free up memory in one click.
All users with low volume RAM We can recommend Memory Clean.
There are a lot of reasons why you might want to check the CPU temperature on your Mac. You might be benchmarking a new machine you bought, or maybe you’re just trying to figure out when the fans kick in. Whatever your reason may be, the problem is that Macs don’t natively offer a feature to check the CPU temperature. Don’t worry, though, in this article I will tell you how you can check the CPU temperature on your Mac, using third party CPU temperature monitors, and a simple Terminal utility.
Check CPU Temperature on Mac with Fanny
One of the best methods to monitor CPU temperature in Mac, is by using Fanny. This app has been developed by Daniel Storm, is available for free and supports macOS Sierra. Along with CPU monitoring, Fanny also lets you check details around the fan. Once you download this app, you can simply move it into the Applications folder, and launch the app.
The app launches as a menu bar icon, which displays information such as the current fan speed, along with the maximum fan speed that can be achieved. Below that, you will see the CPU temperature for your Mac.
The app comes with a Notification Center widget as well, which you can enable by following the steps below:
1.Go to the Notification Center, and on the bottom, click on “ Edit“. It may read 1 New“, instead of Edit.

2. Click on the “+” icon next to “Fanny” to add it to your Notification Center.

That's all, you will now be able to see your Mac's CPU temperature in the Notification Center. This is easier than having it up on the menu bar, because all it takes to launch the Notification Center is a two finger swipe from the right edge of the Mac trackpad.

Check Mac CPU Temperature from Terminal
If you’d rather use the Terminal to check the CPU temperature on your Mac, you can simply follow the steps below:
1. Download the source code for osx-cpu-temp from the GitHub repository , by clicking on the “ Download” button, and then clicking on “ Download ZIP“.

2. Unzip the archive you just downloaded. Then, launch Terminal, and navigate to the directory where you extracted osx-cpu-temp. You can use the “cd” command for this. “cd” into the folder that was extracted from the ZIP file, and then type “ make“. This will build the app, and you can then run it.

To run the app, you just have to type “ ./osx-cpu-temp“. This will display the CPU temperature in the Terminal.

If you want to change the units being used, just use the command as follows:
- “./osx-cpu-temp -F” to display the temperature in Fahrenheit

- “./osx-cpu-temp -C” to display the temperature in Celsius

Note : You will always have to navigate to the “osx-cpu-temp” directory, to run the command. If you don't want to do that, you can add the path to the directory to your $PATH environment variable. Then, you can simply run the command as “osx-cpu-temp” to get the CPU temperature.
Easily Monitor the CPU Temperature on Mac
You can use these methods to easily check the CPU temperature on your Mac, either from the menu bar, the Notification Center, or from the Terminal. I tried all the methods on mine MacBook Air running macOS Sierra and they worked fine. There are a lot of other ways that are available, but most of them are either paid, or require a lot of work to set up, and are beyond the scope of this article. However, if you know of any method that is simple enough to be covered in this article, do let us know about it in the comments section below.
In this article, I'll tell you how to test the performance of different components of your Mac: processor, graphics card, and SSD. The test results will help you understand that it is time to service your computer.
In this article, I'll tell you how to test the performance of different components of your Mac: processor, graphics card, and SSD. The test results will help you understand that it is time to service your computer: . And, of course, compare the performance of your computer with other models.
During tests, you need to monitor the condition of all components. Therefore, first I will talk about two monitoring utilities: Intel Power Gadget And iStat Menus. And then about your favorite test packages: Geekbench, Blender, Cinabench, Prime95, Haven, Vallay And Disk Speed Test.
I will give examples of tests on my computers: a 12-inch MacBook 2015 and a Hackintosh. Here brief characteristics test machines:
 Test MacBook 12 2015 with Intel Core M 1.1 GHz processor
  Hackintosh with Intel Core i7-8700 3.2 GHz processor
 Intel Power Gadget
What is it suitable for?
The program is great for testing temperatures, fan noise, and the computer's ability to handle maximum load. Blender loads all CPU cores and threads at 100% and maintains this load until rendering finishes.
If your computer overheats and starts to throttle the processor, you will see it through the Intel Power Gadget. If everything is good, then the lines will be almost straight.
 My Hackintosh has good cooling, so the frequency and temperature do not change even while running a full Blender test
 Doesn't fit
Blender is not suitable for testing the graphics subsystem in rendering. It has such a function, but it is completely tailored for Nvidia video cards. Rendering on Radeon, which Apple uses, will take longer than on the CPU. So don't even try.
On weaker computers, the test may take more than an hour. In this case, it is better to use Cinabench R20.
We have prepared a selection of tips to help you move from kindergarten amateur poppy growers into a circle of professional poppy growers. You definitely didn’t know 4 of the 5 techniques described in the collection, but we have already fixed that.
The material will help you quickly use the Emoji panel, set a specific application to open a specific file, find out the temperature of the components inside your Mac, quickly resize images without additional software through Automator, and also add shortcuts to web pages directly in the Dock.
How to Quickly Use the Emoji Smiley Bar

While working on this material, we talked to more than ten experienced poppy growers.
It turned out that most of them do not know how to use Emoji normally on a Mac, others use a whole labyrinth of system menus to do this, and only one was aware of quick access to them.
First way for beginners, it involves adding access to a menu with symbols and Emoji in the language icon in the macOS system bar.
To do this, first go to " System Settings", go to the "Keyboard" section and check the box next to "Show the Keyboard and Symbols panels in the menu bar."
Now, when you click on the language icon in the system bar, the item “Show the Emoji and Symbols panel” will be displayed.
I wouldn’t call this way of using all these signs and emoticons in correspondence really convenient. Moreover, I have another option...
The right way involves quickly adding Emoji and symbols to the text through a special menu, which you see in the screenshot under the title of this item.
To use it you need a key combination ⌃Control + ⌘Command + ␣Space.
I emphasize, in addition to emoticons, this menu contains alphabetic symbols, pictograms, technical symbols and other signs. It is from this menu that I pulled the symbols to represent the keyboard shortcuts in the previous paragraph. Comfortable!
How to always open a file in a specific program

This trick is intended for those who have been using Mac for a short time and still miss Windows computers.
For some reason, few people talk about this, but initially macOS uses a different logic for working with files. If on a PC you initially work with documents that you open in a specific program from Explorer, here, on the contrary, you first launch the application, and then select the data to work with. But it's not that important.
To open a specific file not in the default program, but in another application, open an additional menu to work with it, hold down ⌥Option, open “Always open in program” and select the one you need. Unexpected welcome!
That's it, now some other software will be used for a specific file. Moreover, for all other documents of the same type, the default application will still be relevant.
Why is this necessary? For example, you constantly use a template image in Adobe Photoshop, now you can open it in this program instead of “View” with a simple double click.
How to find out the temperature of components inside a Mac

I've never seen an iMac overheat. I think this is due to the fact that few people carry them with them everywhere. MacBook is another matter. From time to time I work on the beach, and on the benches in the park I can collect such collections of advice. The result is a full body of dust, regardless of the regularity of cleaning and overheating.
But it is generally very difficult to determine if a MacBook is overheating by eye. The fact is that the metal body of the laptop acts as one of the tools for heat dissipation for internal components, so it heats up quite well. This is especially noticeable if you work with it on your knees.
Therefore, in this case, what is important to us is not the temperature of the case itself, but the amount of ℃ on the processor, graphics chip and other components. And in the summer all this becomes especially relevant.
All of them are equipped with special sensors that control the activation and acceleration of cooling fans. But you won’t be able to view the temperature without additional software. You need an application like Macs Fan Control, which can be downloaded absolutely free.
In general, this particular program is intended for manual control of coolers, but for our purposes it will also be suitable. The menu on the right here contains all the necessary temperature data; they need to be compared with the recommended ones.
- Critical processor temperature 95℃ (preferably no more than 75℃)
- Searching for graphics temperature 95℃ (try up to 75℃)
- It is better not to overheat all memory above 50℃
If everything inside is too hot, you need to provide access to air for the ventilation holes: remove the MacBook from the bed or sofa, and place it on a hard surface. If the ambient temperature is above 35℃, it is better to at least hide from direct sunlight. If all else fails, you need to go to a service center for cleaning.
How to quickly resize images using Automator

If you regularly work with a lot of images for any purpose, creating a “recipe” for the most common Automator from the standard macOS package will be especially relevant for you.
For example, I constantly change the size of pictures for website materials. Previously, I used clumsy Adobe Photoshop for this simple task. It has an "Image Processor" that hides in the File > Scripts menu. But with Automator this task is simplified.
Step 1. Open Automator and select New Document.
Step 2. From the document type menu, select Service.
Step 3. Select the "Files and Folders" section from the menu on the left.
Step 4. Drag "Get Specified Finder Items" from the list to the menu on the right.
Step 5. Select "Image Files" from the "Service Receives Selected" drop-down menu.
Step 6. Select the "Photo" section from the menu on the left.
Step 7 Drag the “Change image scale” item from the list to the menu on the right and select “Don’t add” in the dialog box that appears.
Step 8 Select the size in pixels or % that your “recipe” will use to process the images.
Step 9 Save the command via File > Save or ⌘Command + S, enter a name for it like “Resize to 1024px.”
That’s it, now in the additional menu for working with images in the Finder there will be a command “Resize to 1024px”, which will instantly change their size to 1024 pixels (this is in my case) in width.
In general, Automator is a very powerful macOS tool that offers so many possibilities that it’s scary to imagine. We Necessarily We will return to its use later.
How to Add Web Page Shortcuts Directly to the Dock

If you constantly visit the site looking for new interesting information, check your social media feeds or visit other sites, I have a great way for you to do it faster and more conveniently.
To do this, just add a shortcut to a web page directly in the Dock.
Step 1. Open Safari and go to the site (for example, website) that you want to add a shortcut to in the Dock.
Step 2. Select the address input field and drag its icon anywhere in the Finder.
Step 3. Select the picture that will be used for the shortcut (the iPhones.ru logo).
Very often, laptops and desktop computers break down due to overheating of the central processor. Such failures usually manifest themselves in the form of constant freezes, spontaneous reboots or shutdowns, and a blue screen of death. Reasons for CPU overheating maybe several.
The most common cause of CPU overheating is contamination of the cooling system (hereinafter referred to as CO). Cooling system contamination occurs due to the fact that most computers use CO on an active basis. The active cooling system consists of a radiator, which is cooled by a flow of cold air thanks to a fan attached to it. After a certain time, active CO becomes contaminated. This occurs due to dust entering the cooling system when blowing.
The next reason for overheating is breaking himself central processor. Failure most often occurs due to a defect in the processor itself.
Overheating can also occur due to CPU overclocking. To solve the problem with overheating and stabilize the temperature of the central processor, we have prepared material in which we will describe in detail the solution to this problem. This article will describe the solution to this problem for computers with various operating systems. Therefore, our material will be useful to users of computers with Mac OS, Ubuntu, FreeBSD and Windows operating systems.
How to find out the CPU temperature on a Windows PC
If your personal computer is running an OS Windows, That temperature detection its CPU is a fairly simple task, since there is a lot of software available to determine its thermal characteristics. Most interesting program for these purposes is HWMonitor. The utility supports all current versions of Windows, from XP to Windows 10. You can download this utility on its official website www.cpuid.com. Installing the utility on Windows OS is quite simple and almost any user can handle it. After installation, launch HWMonitor.
In the window that opens you can see that operating temperature The processor temperature that the utility extracted from the sensor is 60 degrees Celsius. The computer in question has an Intel Core i3-530 installed and uses Windows 10 64 bit. The critical temperature for Intel Core i3-530 is 72.6 degrees Celsius. From this it can be noted that at 60 degrees Celsius this computer should function normally. But what to do if the temperature on the Intel Core i3-530 rises and becomes above critical, as shown below.

In this case, it’s time to think about reducing this indicator.
The following image shows another HWMonitor window in Windows 10 64 bit with a system based on Intel Core i5 3550S processor.

This window shows that the average temperature of the Intel Core i5 3550S CPU cores is 60 degrees Celsius. The critical thermal performance indicator of the Intel Core i5 3550S is 69.1 degrees Celsius, so 60 degrees is optimal for him, but still high. If the thermal value is above 69.1 degrees, in this case it will be necessary to reduce it to the optimal value.

In addition to determining the actual temperature of the processor, in Windows using HWMonitor you can also find out the thermal indicators of the video card, hard drive and motherboard chipset. The HWMonitor utility can save all displayed information to a text file.
In addition to HWMonitor, there are many different utilities for monitoring temperature in Windows. You can get acquainted with other utilities in a separate article dedicated to.
How to find out the processor temperature on a PC running Mac OS
Apple makes very high-quality and reliable computers, but their products often overheat the central processor. It follows from this that for computers with Mac OS monitoring should also be carried out thermal values of the processor part. For the test we will take an Apple MacBook. This laptop has a quad-core Intel Core i7 processor. Also, depending on the configuration, this model can be equipped with Intel Core i5 or Intel Core i3. Simple and free for our task is HWSensors utility for Mac OS, which can be downloaded from its official website http://hwsensors.com. After downloading, install and run the utility.
The utility should launch in a window that shows that the temperature of the Intel Core i7 cores is on average 45 degrees. Also, to take into account the heating history of computer components in Mac OS, the user can use the graphical history in HWSensors.

From the pictures above you can see that the utility can also determine the temperature of the hard drive, motherboard chipset and video card.
From the example, it can be noted that monitoring temperature using HWSensors on Mac OS is quite simple. In addition to HWSensors, another utility called . This utility for Mac OS can be downloaded from the official website www.bresink.com.
The utility, like HWSensors, can monitor all temperature characteristics from sensors in Mac OS.

Monitoring CPU temperature on a computer running Ubuntu 64 bit
For the test, we will take a computer with a 64-bit AMD Athlon II X2 250 processor. The maximum critical heating temperature of the AMD Athlon II X2 250 is 74 degrees. This computer runs on the 64-bit operating system Ubuntu 64 bit. Therefore, to find out the heating temperature of the AMD Athlon II X2 250, we will use Psensor utility for 64 bit Ubuntu. To do this, start the computer and go to the Ubuntu Software program.

In Ubuntu Software, enter “Psensor” in the search.

In the Ubuntu Software result found, click the Install button, after which the installation of the program will begin. After installation, a shortcut to the Psensor program will appear in the Unity panel. Click on the shortcut, after which the program will launch.

In the program window you can see that the core temperature of the AMD Athlon II X2 250 processor is 60 degrees, which is an acceptable result for it. In addition, to quickly find out how much the temperature of the AMD Athlon II X2 250 is, you need to click on the indicator in the form of a thermometer on the taskbar.

The example shows how easily you can use Psensor to find out the core temperature of an AMD Athlon II X2 250 processor in Ubuntu 64 bit. In the same way, as described in the example, you can find out the temperature in 64-bit Ubuntu on systems with other processors.
In addition to the CPU temperature, the Psensor utility can also find out the thermal indicators of the video card, HDD and motherboard chipset in Ubuntu 64 bit OS.
Monitoring CPU temperature on a computer running FreeBSD
For the test we will take a computer with an Intel Core 2 Duo E4300 processor running the OS FreeBSD. The maximum critical heating temperature of Intel Core 2 Duo E4300 is 60 degrees. To find out the temperature of the Intel Core 2 Duo E4300 cores in FreeBSD, you need to download module, which has support for temperature sensors. To do this, enter the “coretemp” command in the FreeBSD console:
After this, we confirm the loading of the module.
After loading the module, enter the command in the console: # sysctl -a | grep temperature It will show us the core temperature of the Intel Core 2 Duo E4300 processor in FreeBSD.

The figure shows that the core temperature of the Intel Core 2 Duo E4300 processor in the FreeBSD OS is 39 degrees. This temperature is optimal for the Intel Core 2 Duo E4300.
The example shows that in the FreeBSD operating system there is no need to install additional utilities to check the temperature of the Intel Core 2 Duo E4300 central processor.
It is especially convenient in FreeBSD to check the thermal performance of the CPU on servers, since on them stable work has special meaning. In addition, thanks to the advanced networking capabilities of the FreeBSD OS, administrators have the ability to monitor the thermal performance of the Intel Core 2 Duo E4300 remotely. Remote temperature readings are especially important on FreeBSD web servers, where thousands of sites operate around the clock.
Checking the CPU temperature in the computer BIOS
Now motherboards from different manufacturers are produced with a new UEFI BIOS. To check the processor temperature, the UEFI BIOS has built-in utility to monitor processor thermal parameters. For the test, we will look at a system based on the MSI A58M-E33 motherboard and the AMD Athlon X2 340 processor. Now let's boot into the BIOS of this system and go to the "" tab.

In the text block " CPU"You can see that the temperature of the AMD Athlon X2 340 is 38 degrees, which is a very good indicator. For the AMD Athlon X2 340 processor, the critical temperature is 74 degrees. If the permissible temperature on the AMD Athlon X2 340 rises from 60 degrees and above, then it’s time for you to think about cooling it. In addition to identifying the temperature of the AMD Athlon X2 340 processor in “”, you can also find out the temperature of the chipset and the rotation speed of the cooler fan.
Also on the left side of the window on the graph you can observe changes in CPU temperature and fan speed.
The test shows how easily you can measure the temperature of the processor cores in the BIOS without loading Windows, FreeBSD or another OS.
Reducing the temperature of the processor cores
If you have determined that the processor of your laptop or desktop computer is overheating, then it is time to cool it down.
We hope that in the near future, thanks to the transition to new technological processes, processors will become cold and overheating will become a thing of the past. We also hope that our article will help our readers monitor the temperature of processor cores in operating systems Mac OS, Ubuntu, FreeBSD and Windows and prevent it from overheating.
Video on the topic
