Is it possible to replace the glass on an iPhone 4. Additional benefits of servicing with us
Broke your iPhone 4? Don't rush to carry it in service center. Below you can find detailed instructions for self-replacement at home.
During the operation of any smartphone, a situation may occur to each owner when the device suddenly falls. Sometimes the phone can suffer from careless carrying in jeans with narrow pockets. In the case of the iPhone 4, this situation happens often, because by modern standards it does not have highest level strength. If trouble happens, the owner has two options:
- replace the glass with another one;
- walking around with broken glass on the display or back panel.
Those who like to save money prefer the first option, not knowing that such an attitude towards their favorite device can cause many problems. It is quite possible to change the glass on an iPhone 4 yourself, but to do this you need to first read the instructions for performing such work, and also acquire the appropriate tools.
The cost of replacing an iPhone 4s screen can, in some cases, be half the price of a fully functional device. Despite the fact that the iPhone 4 and iPhone 4s are almost identical in appearance, it will not be possible to switch from one phone to another. The reason is simple - contact mismatch. If parts are missing from store shelves, you should make your purchase online. You will also need the appropriate tools.
Pay attention! When purchasing tools, you need to select them specifically for the regular “four”. The fact is that the “S” generation changed the configuration of fasteners.
List of required tools
To fully complete the glass replacement work for iPhone 4, you will need the following tools:
- small Phillips screwdriver;
- special Pentalobe screwdriver;
- plastic spatula;
- a thin screwdriver with a flat blade.

Of course, the main tool that facilitates prompt and high-quality repairs is accuracy. There is no need to rush, because the procedure has its own specifics.
Instructions for self-replacement
Below we suggest that you familiarize yourself with all the stages of replacing glass with your own hands on the fourth series of iPhone.


After completing all twenty steps indicated above, you can completely replace the glass on the iPhone 4. All that remains is to install a new whole part, and then repeat the assembly steps in reverse order. During the assembly process, it is important to pay attention to the touchscreen and matrix cables. Make sure they fit completely into the gap without bending. The test is performed while pressing the touch panel against the body.
What consequences can an owner face when using a broken device?
It also happens that iPhone 4 owners decide not to replace the touchscreen, using the old broken one. On the one hand, the phone works, although appearance much worse than the factory one (functioning of a broken iPhone 4s touchscreen is not always possible). On the other hand, the owner risks facing a number of problems:
- The picture is not displayed normally. Since a “mesh” is formed on the surface of the glass, it makes the image very difficult to see;
- Loss of factory seal. Even though the fourth iPhone is not one hundred percent sealed, the surface of the touchscreen is protected from drops of water and oily substances. The presence of cracks on the surface can lead to moisture penetration inside. While walking in the rain, your smartphone may turn off completely and you will not be able to turn it on again;
- brightness distortion. This defect is usually accompanied by a loss of color and picture clarity. The display itself displays information either in fragments or does not do it at all;
- presence of fragments in the smartphone. During sudden movements, they can disrupt the normal operation of the phone. It is quite possible that small particles of glass touch the contacts located on the cables, causing the components through the cables of which they are connected to the motherboard to stop working normally. In addition, the sharp edges of glass can damage the delicate and sensitive skin of your fingers.
Conclusions
Replacing the touchscreen is a mandatory task that must be completed as quickly as possible. This way you can be sure that your smartphone is working properly. The replacement procedure takes more than one hour, although in capable hands the recovery time is approximately half as long. If you cannot restore the device yourself, it is recommended to seek help from service center specialists.
Each model mobile phones Apple become more and more perfect. Despite high quality and product reliability, the glass on iPhone 4 is considered one of the most vulnerable components. The slightest impact or fall can damage it. If you encounter such a problem, contact the LP Pro service center, where, after conducting diagnostics, qualified technicians will tell you the cost of replacing the glass on your iPhone 4 and carry out high-quality repairs.
Replacing glass on iPhone 4
Replacing the glass on iPhone 4 may be required in the following cases:
- The glass broke or a piece of it broke off;
- Presence of minor scratches and cracks;
- Partial or complete lack of sensor response to touch;
- Black bars and strange spots on the screen;
- The presence of abrasions that make working with the device less convenient.
It should be remembered that attempts to fix the problem at home can only damage the phone and lead to more complex and expensive repairs.
Glass replacement on iPhone 4 at LP ProIf you discover that the iPhone 4 display glass is damaged, use the services of the LP Pro repair shop. Experienced technicians will conduct thorough testing to determine if there is any additional damage. Only after the diagnostic results will the technicians tell you how much it will cost to replace the glass on an iPhone 4. By contacting LP Pro, you not only save your time, but also get high-quality repair work and first-class service.
The iPhone 4 and its upgraded version 4s, at this point in time, have already become a legend. Users of modern versions of the iPhone remember with nostalgia the fourth version, compared to the breakdowns of the iPhone 5, that iPhone now seems very reliable. Then there were no iCloud locks of any kind, and if you forgot your password, or the sellers set it up for you in the store, you could simply reflash your phone, and it would be as good as new. But let's get to the point, how did the displays change then?
iPhone 4s screen replacement process
First of all, let’s figure out what the procedure for replacing glass on an iPhone 4s is. If you don’t want to read further or you don’t have the time and desire, then you can contact us to replace the glass on your iPhone 4 here. In fact, the display module, consisting of glass, touchscreen and display, is changing. And when they talk about a glass replacement service, they mean that the entire display assembly will be replaced, and not the glass separately.
So, we unscrew two bolts from the bottom end of the iPhone and remove the cover; it should simply slide down at the top, towards the camera. And so, we see the battery, the motherboard, and a bunch of bolts screwed into it. Now the most important thing is to unscrew all the bolts and do not forget their location, since all bolts are different. Next you will have to unscrew the same number of bolts.
After we remove the motherboard, we will need to unscrew more bolts, only this time from the frame to which the screen is attached. 6 large bolts and 4 small ones.
Then everything is simple, take the display out of the iron frame and install a new one. Now comes the hardest part, you have to screw the whole mountain of bolts back in, and if at first you were too lazy to lay out the bolts and remember which ones came from, now suffer and be tormented.

The main difficulty at that time when replacing the display on the iPhone 4 was the problem with the proximity sensors. They didn’t want to work on some screens. Most of the craftsmen agreed that the Chinese did not paint the window in the glass for the proximity sensor correctly. We had to come up with ways to eliminate such a defect, because you can’t explain to the client that you had nothing to do with it, it’s just a crap spare part. But when they call us and ask a stupid question like “do you have an original screen?”, we always answer “of course, it’s original.” There is one thing, Apple does not supply its parts to any of its services. After all, they don’t have repairs, they just give you another device and that’s it. Therefore, all spare parts that are on sale have never been and will never be original.
Don’t be naive and call different services and hope that they will tell you, yes, only we have original displays, others have a Chinese copy. Jobs himself supplies us with spare parts. Apparently these words are what customers expect when they ask about the originality of Apple parts.
Thanks to this guide, you can do it yourself. Replacing the display module will give you new glass, touch screen and LCD display. The LCD screen is glued to the glass at the factory and it is very difficult to separate them without damage. After successful replacing the display module in iPhone 4, we recommend protecting your new display from scratches, it is necessary install protective film.
iPhone 4 disassembly tools
- Plastic tools Opening
- Small flathead screwdriver
- Spudger
- iPhone 4 5-point Pentalobe screwdriver if iPhone has external pentalobe screws
- iPhone SIM card removal tool or paperclip
Step 1 — iPhone 4 Back Panel
iPhone 4 back cover May have either a 2#000 Phillips screw or an Apple 5-Point "Pentalobe" screw. Check what screws your model has and make sure you also have the right screwdriver to remove them.
Remove the two 3.6mm Pentalobe or Phillips #000 screws next to the dock connector. During reassembly, we recommend that you replace the 5-point screws with the same type as Phillips screws.
Step 2 - Remove the back panel
Press the back panel at the top of the iPhone 4 and slide the panel back 2mm.
Step 3 – Remove the back cover of iPhone 4

Step 4 - iPhone 4 Battery

Remove the one 2.5mm Phillips screw holding the battery connector to the board. Some models may have 2 screws, one of which holds the pad, which is located above the screw.
Step 5 - Metal Connector

Use iPod opening tool To remove the battery connector, pry it close to the top and bottom edges of the iPhone 4. Be very careful to only lift the metal connector, not the black connector on the motherboard. If you try to lift the board connector, you may break the connector completely.
Step 6 - Remove the battery from the iPhone 4

Pull the clear plastic tab to remove the iPhone battery. Be careful when removing the battery with the plastic tab. On some models, Apple uses a large amount of adhesive, which makes it almost impossible to remove the battery this way, and therefore the plastic tab can be torn off.
To remove the batteries, use a plastic scribe. To do this, pick up the battery on the right side, since there is no glue used at all.
Remove the battery.
Before replacing or reinstalling the battery, make sure the contact pads (shown in red) are correctly positioned next to the battery.
Before assembly, make sure all metal contact pads are clean, if not, use a special lubricant such as Windex (96% ethanol alcohol, and make sure the contacts are dry after wiping). Oil on the fingers can interfere with the electrical conductivity of some contacts and cause interference.
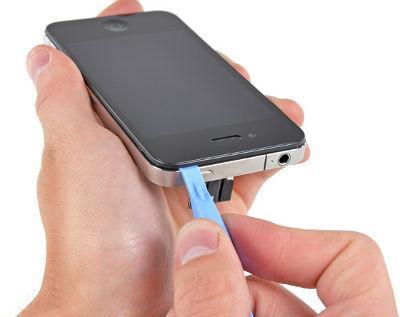
Step 7 - Removing the SIM Card from the iPhone 4

Using the tool for removing the SIM card or a paper clip to remove the SIM card and its holder.
Step 8 - IPhone 4 Dock

Remove the following two screws:
- One 1.2mm Phillips
- One 1.6mm Phillips
Pull out the thin steel connector of the iPhone 4 cable management dock.
Before reassembling, be sure to clean the pads on the dock connector cable cover.
Step 9 - Dock Cable Connector

Gently lift the dock cable connector up and away from the system board.
Step 10 - Dock Cable

Carefully remove cable for docking station and lower speaker. Do not use excessive force to disconnect docking station cable from the system board, the cable can easily break.
Step 11 - Antenna

Disconnect the lower antenna connector at the top from its slot on the board.
Step 12 — Fastening the iPhone 4 motherboard

Remove the 1.9mm Phillips screw at the bottom that holds the motherboard to the case.
Step 13 - iPhone 4 Wi-Fi Antenna

Remove the next 5 screws securing Wi-Fi antenna to the board:
- One 2.3mm Phillips
- Two 1.6mm Phillips
- One 1.4mm Phillips
- One 4.8mm Phillips
When assembling, start with the 4.8mm Philips screw and then the 2.3mm. This is done in order not to confuse the sequence and to avoid damage to the LCD and touch screen. Also make sure that the long 4.8mm Philips screw is put back in the correct order. Since it is the basis for Wi-Fi antennas and is often the culprit bad wifi reception after assembly.
Step 14 - Pull out the Wi-Fi antenna

Slightly lift the top edge of the Wi-Fi antenna away from the system board.
Pull out Wi-Fi antenna for iPhone 4. Be careful not to lose the metal clips on the top cover and the 4.8mm screw. Their loss is the main reason bad WiFi signal after assembly.
Step 15 — iPhone Rear Camera

Carefully lift and remove rear camera from the socket on the board.
Step 16 - Warranty sticker and water ingress indicator

Remove the small round white sticker - this is warranty sticker and water ingress indicator, covering the screw next to the battery tab. Remove the 2.4mm Phillips screw that was hidden under the sticker.
Step 17 - Cables

Use the edge of the plastic opening tool to carefully pry the following connectors out of their sockets on the motherboard:
- touchscreen cable
- LCD screen cable
- headphone jack and cable volume buttons
- microphone
- front camera cable
Step 18

Using a small screwdriver, remove the 4.8mm screw next to headphone jack. When assembling the device, this screw sets the height WiFi screen, filmed earlier. The screen should be flush with the headphone jack.
When assembling the board, make sure that the edge of the board is under the circle, otherwise the screws will not fit.
When assembling, make sure that the small rubber gasket is in its place at the top iPhone 4 motherboard. Without this gasket on the motherboard, the cable around it may be damaged.
Step 19 - iPhone 4 Motherboard

Remove carefully iPhone 4 motherboard, disconnecting any cables that might come in your way. Be careful not to damage the small gold plated contact (marked in red at the top) - it is a very fragile part.
Step 20 - Speaker

Remove one 2.4mm Phillips screw from the speaker housing towards the inside of the frame.
Step 21 - Speaker
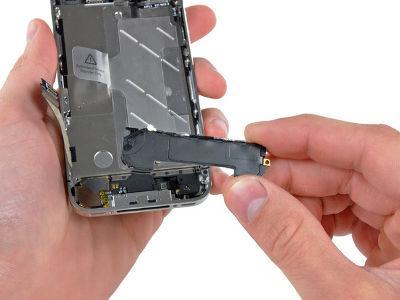
Remove the housing iPhone 4 speaker.
Step 22 - Vibration Motor

Remove the next 2 screws holding vibration motor to the inner frame:
- One 6mm Phillips
- One 1.4mm Phillips
Pull out iPhone 4 vibration motor.
Step 23 - Headphone Jack

Remove the 1.5mm Phillips screw on the front panel next to headphone jack.
Step 24 – Volume Side Button on iPhone 4

Remove 3 large 1.5mm Phillips screws lengthwise side volume button on iPhone 4. Be careful not to lose the washers under each of the screws.
Step 25 - Microphone

Unscrew the 1.5mm Phillips screw near the bottom microphone.
Step 26 - Dock

Remove the 1.5 mm Phillips screw next to the ribbon cable from the connector docking station.
Step 27 — SIM card holder and sleep button

Unscrew the 3 large 1.5mm Phillips screws lengthwise SIM card holder iPhone 4. Don't forget the washers under each screw.
Unscrew the 1.5 mm Phillips screw near sleep buttons.
Step 28 - Opening the front panel of the iPhone 4
Insert the opening tool into the gap between rubber frame around a glass front panel and a steel internal frame. Do not try to insert the tool between the glass and the rubber frame.
Carefully lift the top edge of the front panel away from internal steel frame.
Step 29 - Separating the Front Panel

Carefully separate top edge of front panel from the inner steel frame.
Carefully separate bottom edge of front panel from the internal steel frame.
Be careful sometimes Home button sticks to the front panel and you can break the cable from it.
Step 30 - Touchscreen and screen cable

Before reattaching the front panel to the internal steel frame, ensure that cables from LCD screen and touchscreen are not twisted or pinched between the inner frame and the front module - this could damage the cable. When the front panel is installed correctly cable from LCD and touch screen should be next to each other and the same length, and should just hang over the steel frame.
When replacing the front module, remember that you may have to re-install change speaker grille And clear plastic rings around the anterior chamber. It all depends on where you bought it Iphone 4 spare parts.
After assembly, protect your new display from scratches by gluing it to protective film.
Step 31 — Replacing the Iphone 4 Screen

Usually new lcd screens for iphone 4 Come with red plastic film on the back l cd display. If you have one, use the tab near Home buttons to remove the film from the LCD screen before installing a new one display on iPhone.
Video instructions for disassembling iPhone 4
