What is an Internet center? ZyXEL Keenetic - home Internet center that can do everything
In this article we will configure an excellent, inexpensive ZyXEL Keenetic Start router. You can take a closer look at this device, read and leave your review about it at , which is entirely dedicated to this model. There I also described my impressions of this router and indicated the main characteristics.
ZyXEL Keenetic Start is an excellent router for the home that can easily handle connecting your computers, phones, tablets and other devices to the Internet. Both via Wi-Fi and network cable. You can watch IPTV and organize a local network between your devices. Keenetic Start looks very nice. The device is definitely worth the money. I won’t describe all its pros and cons, you can see that at the link I gave above. And if I don’t forget, I’ll do a short review of this router later.
In the meantime, ZyXEL Keenetic Start is standing on the sidelines and waiting for me to start tormenting it, I’ll write more about the ease of setting up this router. Until recently, I thought that routers from Tp-Link had the simplest and most understandable settings panel, but it turns out that I was wrong. ZyXEL really took care of its users. We made a very simple and understandable control panel; all buttons and connectors on the device are also labeled in clear language. So, setting up ZyXEL Keenetic Start should not cause any difficulties. And according to this detailed instructions, you will set up your router in a few minutes.
As usual, we will divide the article into several sections:
- Connecting the ZyXEL Keenetic Start router and setting up the Internet (WAN)
- Setting up PPPoE, L2TP and Static IP
- Setting up a Wi-Fi network, setting a password
Connecting and setting up the Internet on ZyXEL Keenetic Start
I recommend setting up by connecting the router via a network cable to a computer or laptop. If it is not possible to connect via cable, then in principle you can establish a connection via Wi-Fi. First of all, we need to connect the router to the device through which we will configure it. There is one point here: if your provider binds by MAC address ( you can call support and ask), then it is best to configure from the computer to which the Internet is connected.
Factory reset
If you have already tried to configure the router, or it has been configured before, then I advise you to reset the settings to factory settings. So that in the settings there are no parameters left from the old provider, etc. Resetting the settings on ZyXEL is very simple.
Take something sharp, a needle, or a paper clip. Then, press and hold the button for 10 seconds Reset on the back of the router.
All indicators should go out and light up again. We can continue.
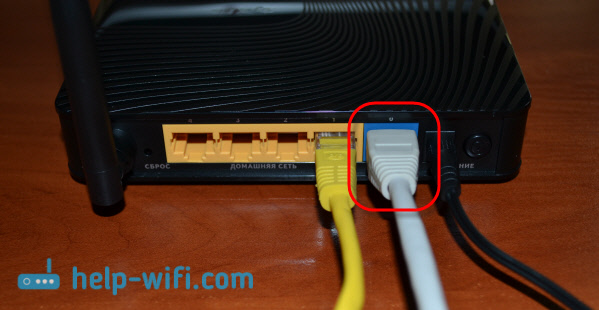
We take the network cable that comes with the ZyXEL Keenetic Start and connect it to a computer or laptop. On the router we connect to one of the yellow connectors that are labeled "Home network", and on the computer to the network card. Like this 
Plug your router into a power outlet (if you haven't turned it on yet). It may be that the power is still turned off with the button on the back of the router, check. On the front panel, there are indicators by which you can monitor the operation of the router. The modes of these indicators are very well described in the instructions for the device. And in general, the instructions for the routers of this company are very good and clear. That's it, you can leave the router for now.
Login to settings
On the computer from which we will configure, open any browser. In the line where you write the website address, write the address for accessing the ZyXEL Keenetic Start settings and press Enter. It's either 192.168.1.1 , or my.keenetic.net. Which one do you like best?
Please note that the router's web address, the standard name of the Wi-Fi network, the password for this network and the MAC address are indicated on the label on the bottom of the router.

This information will definitely come in handy.
The router settings should open. You can see detailed . The article was written using this model as an example. This article also describes how to connect to the Wi-Fi network of a new router.
The main thing we need to know to configure the router is what type of connection your ISP uses: Dynamic IP (for example, Kyivstar), Static IP, PPPoE (Rostelecom, TTK, Dom.ru), L2TP (Beeline). It’s very easy to find out: call the provider and ask, go to their website and look there, or just find it on the Internet. You also need to find out whether the provider binds to the MAC address of the device. Very often, Dynamic IP connection technology is used, and it is very easy to configure. Above I wrote what technology popular providers use. There is also a detailed article on this topic:.
If your provider uses Static IP, PPPoE, or L2TP technology, then you must have data (IP address (optional), login, password) that will need to be specified during the setup process.
After updating the firmware to version v2.04(AAKV.1)C6 and newer (you may already have this version), with the help of a special wizard you can set up a connection with your provider much easier. There you can already select the country, region (city), provider and set the necessary parameters. If you have a button in the control panel, then press it and go to step-by-step setup. If not, then you need to update the firmware.
Setting up a connection using Dynamic IP technology
This means that the cable from the provider is connected to the router, we went into the settings and select the item. If there is no “quick setup” item, then you need to reset the settings. I wrote above how to do this.

Since the router automatically connects to the Internet using Dynamic IP technology, it will immediately prompt you to update the firmware if there is a new one. Click on the button "Update".

We wait for the router to download the firmware itself, install it and reboot. When you see a message that the component update is complete, click "Further". In the next window, the router will prompt you to enable the function "Internet filter Yandex.DNS". If you enable this function, the router will block access to sites that Yandex considers malicious. You can disable or enable this feature in the settings at any time. Click Further.

We see a message that the router is configured and the connection to the Internet is established. You can press the button Web Configurator and go to Wi-Fi settings networks, etc. I will write about this in this article below.

The Internet should already be working. You can connect your devices to the router. If you do not want to change the Wi-Fi network name and password, you can use the standard connection information, which is indicated at the bottom of the router.
Connection setup: Static IP, PPPoE, L2TP (Beeline)
Things are a little different here. In the router settings you also need to select .
The router will think and try to connect to the Internet, but it will not work, since for these types of connections, you need to set the necessary parameters. To begin with, it will offer to configure the MAC address. You need to know if your ISP does tethering. If not, then leave the item "My ISP does not register MAC addresses" and click next. If the provider does the binding, and you have the binding configured on the computer from which you are configuring, then select "This computer's MAC address". In other cases, you need to call the provider's support and ask him to bind the MAC address of the router (which is indicated at the bottom of the device, or in the same window).


In the next window, you need to specify your username and password (which your provider should give you) to access the Internet. If you have PPPoE or L2TP technology, then this data must be present. If you just have a Static IP, then check the box that says you don’t have a login and password.

The router must establish a connection with the provider. If nothing works, then go to the Web Configurator, to the tab "Internet", then select PPPoE/VPN, then press the button "Add connection" and fill in all the required fields. We select the desired type of connection, set the login, password and other parameters that your provider must provide. For example, setting up Beeline Internet:

You can edit created connections, delete them, and create new ones.
Setting up a Wi-Fi network and setting a password on Keenetic Start
If the Internet is already working through the router, then all that remains is to configure the wireless network. You don't have to do this. Your Wi-Fi network will have a standard name, and to connect to it you can use the password, which is indicated along with the name on the bottom side of the router. But, you can change the network name and password. It's not difficult to do this. You can also set up IPTV (if your provider provides such a service), configure LAN, or . It is not necessary to make all these settings. To use the Internet, you just need to configure ZyXEL Keenetic Start to work with your provider, which is what we did above in the article.
You can set up a Wi-Fi network on the tab "Wi-Fi network". I recommend setting only a new network name and password. The password must be at least 8 characters. Create a password and be sure to write it down. If you have forgotten the password for your network and want to remember it, or want to change it, you can do this in detail. You can leave the rest of the settings as they are in the screenshot below. Don't forget to click on the button "Apply" to save the settings.

If in the same window you go to the tab "Guest Network", then you can launch another wireless network for your guests, or for clients in the office. main feature is that everyone who connects to the guest network will not have access to the local network.
And also, in the settings you can. I think you will find it useful.
Afterword
Setting up any ZyXEL router should not cause any problems. The control panel is not complicated. True, WAN setup (connections with provider) they did something interesting. But, after updating the firmware, the NetFriend quick setup wizard appeared, with which it is very easy to configure the router to work with the provider.
If you have any questions about setting up ZyXEL Keenetic Start, you can leave them in the comments to this article. Best wishes!
Review of the Internet center from ZyXEL - Keenetic 4G . I decided to update the equipment at home, in particular related to the network. The old Dlink router was simply wretched; after reading the forums and studying the characteristics, the choice fell immediately on this device.
I am glad that this company has excellent technical support that can solve many user issues, the firmware is good and stable. Updates are regular and stable. The functionality is pleasing, the interface is built easily, simply, accessible and in Russian.

Since the device was developed (the software part) in our country, everything was taken into account for domestic users.


With the help of the keenetic Internet center, you can provide the whole family with a network and the Internet, the device has mounts to hang it on a wall, for example, which is what I did, although there are wonderfully thought-out rubber feet on which you can place it on a windowsill or table, for example, the operating mode indicators are bright. Rosary beads signed with badges. They can be easily seen from afar.

The wi-fi signal is very powerful, it covers the entire house, it is possible to use a regular connection and a guest network at once, plus you can use it as a client.

Two lan ports for connecting with a cord, and wan for connecting to the provider with a wire if necessary, the ports can be reassigned if necessary. The Internet center comes with a whole set of cords, a meter-long twisted pair cable, not as is now customary to make 30 cm stubs. The USB extension cord is also long. Qualitative. And it has a suction cup (very convenient) for attaching to glass, for example.

On the window, the modem will clearly be able to catch better (the optimal location is selected experimentally on the spot).

The device is powered by a 12 V 1 A switching power supply. The kit is packaged very well in a high-quality box. Everything is beautiful and clear.

Description from the manufacturer's website:
Internet center Keenetic 4G intended for permanent wireless connection to the Internet via cellular networks 3G and 4G using external USB modems. With Keenetic 4G, you can connect several home or office computers into a network and organize for them simultaneous secure Internet access from anywhere within the operator’s coverage area mobile communications using just one USB modem. Built-in wireless access point Wi-Fi networks new generation with a powerful omnidirectional antenna provides connection to the Internet center of laptops and other network devices of the IEEE 802.11n standard at speeds of up to 150 Mbit/s*. If necessary, Keenetic 4G allows you to connect to the Internet via a dedicated Ethernet line at speeds of up to 80 Mbit/s** in order to actively participate in file-sharing networks, receive high-definition IP television, use information and entertainment resources of regional networks and local servers provider.
Characteristics of the device considered in the review from the manufacturer’s website:
Main features of the Internet center
USB host controller for 3G/4G modems (see list of supported modems)
Support for access and authorization in provider networks via PPPoE, PPTP (including MPPE), L2TP and IEEE 802.1X
Link Duo technology for simultaneous work on the Internet via PPTP/L2TP/PPPoE and with regional network server resources
Ability to connect to Internet providers providing VLAN-based services (IEEE 802.1Q)
Hardware support for IP-TV TVport for watching TV shows on IPTV receivers and computers, including via Wi-Fi
SPI Firewall with DDoS Protection
Wireless IEEE 802.11n 150 Mbps*
Operating modes
Connecting to a provider via a dedicated Ethernet line
Connecting to a provider via a wireless Wi-Fi network
Connecting to a provider via a 3G USB modem
Connecting to a provider via a 4G USB modem - Yota
Dot wireless access WiFi
Design features
3 RJ-45 connectors (10BASE T/100BASE T) with automatic cable type detection
1 x USB 2.0 type A
1 RP SMA socket for connecting an external Wi-Fi antenna
1 detachable 5dBi omnidirectional antenna
7 status indicators
Button for resetting user settings - “RESET”
Wi-Fi network quick setup button - “WPS”
Supported Features and Protocols
IPoE/PPPoE/PPTP/L2TP
PAP/CHAP/MS-CHAP/MS-CHAP v2/802.1x
MPPE (Auto/40/56/128)
VLAN - IEEE 802.1Q
TVport technology - transit of Multicast streams to automatic mode and without wasting CPU time when assigning a LAN connector
Link Duo - simultaneous access to the Internet (L2TP/PPTP/PPPoE) and to local resources of the provider’s network
DHCP (client/server)
Working with a Static IP Address
IP Protocol Routing
NAT (Restricted Cone) IP Address Translation
Route Table (DHCP/Manual)
Firewall (SPI) with protection against DoS and DDoS attacks
Port Forwarding (Manual/UPnP)
IGMPv1/IGMPv2 agent (IGMP proxy, IGMP snooping)
VPN connection transit (PPTP or L2TP)
Client for DynDNS, NO-IP and TZO services
DNS Agent (DNS Proxy)
Blocking Internet access based on MAC address, IP address, URL, TCP/UDP ports
Wireless Wi-Fi network
IEEE 802.11 b/g
IEEE 802.11n (auto 20/40 MHz, 1x1 configuration, up to 150 Mbps*)
Frequency range - 2.4 GHz
Network protection WEP/WPA-PSK/WPA2-PSK, blocking by MAC addresses
WPS Quick Setup (PBC/PIN)
Wi-Fi Multimedia (WMM) mode
Diagnostics and management
Quick setup of ZyXEL NetFriend in Russian
Web configurator in Russian
FTP/TFTP/TELNET
Ability to control from an external network (web configurator/TELNET)
Configuration Backup and Restore
Software update functions
System log
Physical parameters
Dimensions - 139 x 110 x 32 mm excluding antennas
Weight - 180 g without power adapter
terms of Use
Operating temperature range: from 0 to +40 °C
Relative humidity: 20 to 95% non-condensing
Power supply voltage: AC 100–240 V, 50/60 Hz
Requirements
Availability of Internet access
Computer running operating system Microsoft Windows 2000/XP/Vista/7 equipped with an Ethernet network adapter and an optical drive
Equipment Keenetic 4G
Internet center Keenetic 4G
Detachable 5dBi omnidirectional antenna
Power adapter
Ethernet cable
USB extension cable
Instructions for use
CD with documentation and ZyXEL NetFriend program
Warranty card
Notes
* 150 Mbit/s - maximum speed work at the physical layer according to the IEEE 802.11n standard when connected to adapters that use one spatial stream and a 40 MHz channel for reception and transmission. The actual data transfer speed in a wireless network depends on the features and settings of the client equipment, the number of clients on the network, obstacles in the signal path, as well as the presence of other wireless networks and radio interference in the same range.
** 80 Mbit/s- maximum practical throughput of the built-in router, measured in the ZyXEL laboratory. The actual speed of access to the Internet, local resources and IP television depends on the type of service and connection provided by the Internet provider, the current load of the provider’s network, the data transmission route, as well as the actions and characteristics of third parties and communication objects.
to connect to the Smile network
First, you need to connect all cables to the appropriate connectors:
- Food.
- Incoming Ethernet cable from the provider (to the corresponding WAN port.)
- Ethernet cable from the network card to any LAN port on the router. (usually indicated by numbers.)
For Windows XP:
Go to the menu ![]() , .
, .
In the network connections window (Figure 1), right-click on “ " and select " Properties».

Figure 1. Network connections window in Windows XP.
In the window " Local Area Connection Properties"(Figure 2) select " Internet Protocol tcp/ipProperties».

Figure 2. Local network connection properties.
In the window " Properties of the Internet Protocol TCP/IP» (Figure 3) select:
- « »
- « »
and click the button OK»

Figure 3. TCP/IP protocol
For Windows 7:
Go to the menu ![]() ,
,  , .
, .
In the window " » (Figure 4) click ![]() .
.

Figure 4. Network and Sharing Center window shared access" in Windows 7.
In the window " "(Figure 5) find " LAN connection", right-click on it and select " Properties».

Figure 5. Network Connections window in Windows 7
In the window " Local Area Connection Properties" (Fig. 6)) select the item " Internet Protocol Version 4 (TCP/IPv4)"(WITHOUT unchecking the checkbox) and click on the " Properties».

Figure 6. Local network connection properties in Window 7.
In the window " Properties: Internet Protocol Version 4 (TCP/IPv4)"(Figure 7) select:
- « Obtain an IP address automatically»
- « Obtain DNS server address automatically»
and click the button OK»
Figure 7. TCP/IP protocol
Go to the command line (Figure 8) (Start=>Run=>enter the command “cmd” and click the “OK” button).

Figure 8 Launching the program
At the command line (Figure 9), type the command “ipconfig -all”. Make sure that the IP address is assigned and is in the same range as the IP address of the Internet router.

Figure 9 Command line
Type the command ping 192.168.1.1 and make sure that packets are being exchanged with the Internet router.
Next, you need to go to the router’s web management interface. To do this, open your browser, enter the router’s IP address in the address bar (default http://192.168.1.1) and go to this address (Figure 10).
Figure 10. Browser address bar
The first time you try to log in, you will be prompted to change the router administrator password (Figure 11). Specify " New administrator password" And " Enter your password again" Click apply.

Figure 11. Setting the administrator password
To access the router's web interface, you will need to log in. Enter your username (default admin) and password (default 1234 ), then click " OK"(Figure 12).

Setting up Internet access
To set up Internet access:

Setting up a wireless network
To set up a wireless network:

Your Zyxel Internet router is configured to work on the Smile network
Setting up a router for IP-TV
For IP-TV operation:

Magazine
You may also need data from the router log. To get this information, click on the " System" and select the tab " Magazine"(Figure 18).

Figure 18. Magazine
Supported providers:
InterCom, Yota, MTS, BeeLine, Megafon.*
* With router firmware, for Chekhov region .
Order or install firmware you can call: 8 - 916-990-75-90
1. Connect your computer to the ZyXel Keenetic 4G router and set up an Internet connection.
Before you start setting up the Zyxel Keenetic 4G, please read the attached “Instructions for Use” that comes with the router. Next, connect the router to an electrical outlet, then connect the USB antenna cable to the USB interface of the ZyXel Keenetic 4G router, and connect one of the LAN ports of the Internet center with a yellow patch cord (wire) to the network card of your computer.
After that, you need to change the TCP/IP settings of the network card of your computer or laptop to automatically receive IP address values (DHCP client) from the Keenetic router via the LAN and WI-FI interface.
1.1. Setting up a Zyxel Keenetic 4G connection in Windows XP:
Start - Control Panel - Network Connections - Local Area Connection - Properties - Internet Protocol (TCP/IP) Check the boxes next to: Obtain an IP address automatically and Obtain a DNS server address automatically. Next OK
1.2. Setting up a Zyxel Keenetic 4G connection in Windows 7:
Start - type “View network” - select at the top in the search results View network connections - Local network connection - Properties - Internet Protocol version 4 (TCP/IPv4) - Properties Check the boxes next to: Obtain an IP address automatically and Obtain a DNS server address automatically. Next OK


1.3. Monitoring the computer connection to the Zyxel Keenetic 4G router
By default, the Zyxel Keenetic 4G Internet Center produces IP address values from the range 192.168.1.0/24, so after some time your computer should itself receive the required address like: 192.168.1.33. You can track the receipt of an IP address from the router by opening the “Local Network Connections” status. An inscription saying, Assigned to DHCP (Windows XP) or DHCP enabled - Yes (for Windows 7) indicates that the Zyxel Keenetic 4G router has successfully assigned an internal IP address to the computer via the LAN interface. If this does not happen, then problems with the operation of the DHCP client on your computer are possible. Most often this can be caused by the operation of firewalls (firewalls), but there are other reasons... In this case, you need to enter the necessary IP addresses in the computer settings manually. To do this, just specify the following IP parameters on your computer: IP - 192.168.1.101 Subnet mask - 255.255.255.0 Default gateway - 192.168.1.1 DNS - 192.168.1.1


2. Setting up the Zyxel Keenetic 4G router
The setup process is carried out through the device’s web interface. To do this, open your favorite browser and enter the address 192.168.1.1 in the address bar, press Enter. In the window that opens, enter Username admin and password default is 1234.

Further

All is ready!
The indicator on the router (in the form of a globe) should light up green.
The Yota operator uses equipment from the manufacturer Gemtek in its work. Yota Internet Center allows you to organize access for subscribers of the local network created on its basis to the operator’s cable networks and mobile internet 4G LTE. IP telephony support is provided.
On the back wall of the device there are connectors that allow you to make the necessary connections with consumers:
- DC 12V DC power connector;
- 2 LAN ports (RJ-45) for connecting consumers via Ethernet cable;
- 2 ports (RJ-11) for connecting telephone sets to provide IP telephony;
- Yota SIM card slot;
- "RESET" button to reboot the router.

The state of the indicators located on the front panel determines the presence of connections to consumers and the serviceability of communication lines with them on individual ports, and allows you to evaluate the level of the high-frequency signal of 4G LTE and the local Wi-Fi network. The built-in antenna of the operator's network is located in the upper part of the case.
The router is configured from its web interface. First you need to connect one of the RJ-45 ports to the network card of your desktop computer (PC) using the Ethernet cable included with the product. There is no difference between ports. The operator SIM card must be inserted into the slot on the back of the router.
The router should obtain addresses automatically. The settings of the network card are responsible for this. To check this, you need to find the Internet connection icon on the right side of the taskbar and click on it with the left mouse button. In the "Network and Sharing Center" you need to expand the "Change adapter settings" item.
In network connections, the PC from which the configuration is being made is selected, and the “Properties” item is opened in its context menu. After selecting Internet Protocol version 4, you need to check the box for automatically obtaining addresses. The information fields must then be empty. The entered information must be saved (“OK”).
To configure the Internet center, you need to enter its interface. This is done on a computer connected to its LAN port. In the address bar of any web browser open on it, you must enter the address status.yota.ru or the IP address 10.0.0.1 and press the “Enter” command on the keyboard. In the window that opens after this, write down their factory values in the username and password fields. Username - admin, password - admin. After entering them, the main router settings page opens.
Instructions for setting up the Yota Internet center
For search necessary information in Gemtek LTE Yota there is a top horizontal menu of a group of tabs. Each item selected in it corresponds to a left vertical list of tabs that are valid for this group.
LTE connection does not require setup. In the "Management" group, select the "WAN" tab and check in its fields: Operating mode - "Router", Connection establishment - "DHCP". After this, you need to click the “Apply” stencil. You can view the status in the "Information" group and its "LTE Network" tab. Possible options: "Missing", "Searching", "Connected". The connected state corresponds to the lit connection and level LEDs Yota signal LTE on the front panel of the router.

